Sunday, April 28, 2013

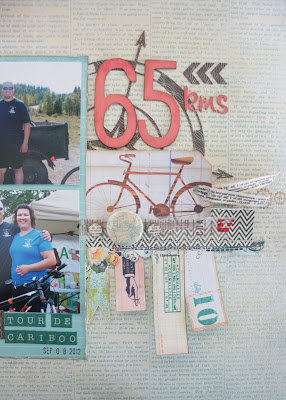
65 kms


Hi Bloggers! Just wanted to pop in quickly and share a layout I made for Scrapping Everyday Miracles. They have a fabulous page maps sketch up for their challenge and a twist to use Washi! 

These pictures are of my husband and I last year when we did the Tour de Cariboo. We did a relay with a couple other people. I didn't know how far I could go, so I wanted to start at the beginning and go until I couldn't anymore. I rode 65kms!! I was pretty proud of that accomplishment! I really wanted to do the entire race this year, but since the race is in the beginning of September and I will have just had a baby about a month earlier, I'm thinking that's not such a great idea!! I'll be cheering on Chris from the sidelines with all our boys!

I hid my journaling in the top right hand tag that I tucked under the photo mat.


I used my Cameo for the "65kms", the compass, and the chevron arrows. I wanted quite a big lettering for the 65 and I wanted it to stand up a bit, so I cut the same thing over 4 times and glued them together to get a "chipboard" effect.


I'm playing along with the ladies over at Use Your Stuff too...I really tried to dig into my stash and use some of my older supplies. The main paper is new to me, and the tag and flair and letter stickers and the washi, the wood veneer...Yikes! I'm just realizing how crappy I did at actually using my stash!! lol The banner was cut from an old paper from "the house of three", I did use a couple old stamps and the paper that I used to cut the compass was an older one too...oh, and the Tim Holtz ribbon I've had for a couple years too...okay, so I didn't do great, but I did okay! lol The important thing is that we use up some of our stuff instead of hoarding it all right?! 

I will try to do better next time!! LOL 

Supplies: Patterned Paper and letter stickers: Authentique. Scrap Patterned paper: Studio Calico, Echo Park and House of Three, and Dear Lizzy. Washi Tape: Freckled Fawn. Flair: The Paper Bakery. Stamps: Hero Arts, Inkadinkado and K&co. Ink: Ranger Distress and Archival. Wood Veneer: Studio Calico. Die Cutting Machine: Silhouette Cmaeo. Ribbon: Tim Holtz. Sewing Machine: Janome. Thread: Gutermann. Tags: Cosmo Cricket.


Thanks so much for stopping by and leaving me some love! I really appreciate all your kind words!!
Blessings

Sarah

Friday, April 26, 2013

Baby You Can Drive My Car


Good Afternoon my crafty peeps! How has your day been so far? Mine has consisted of dishes, laundry, a little crafty clean up, and I actually coloured my hair too! yaaaay!! It's been sooooo long that I think my coloured hair had just turned into "tips" lol That's what happens when you're a hairdresser...it's like the mechanic with the crappy car...we always do our own hair last :)

Anyhoo...I wanted to show you a layout I made last night. I started it quite late last night, because I actually wasn't planning on getting any time in my crafty space. As I was watching Grey's Anatomy last night however, I stumbled upon a fabulous Ink Wash tutorial by Kim Watson, and I was inspired to create this! You can check out the tutorial HERE.

I have to apologize for the lack of quality in the photos of my layout though...it's overcast here, so that's strike one for getting a nice shot, but I always find it harder to photograph pictures that have bendy paper! This paper is really bendy from the Ink Wash technique...If anyone has any amazing tips on A: straightening out your paper after you get it wet, or B: taking better pictures when there is no natural light, please! let me know!

I used my Heidi Swapp Color Shine mists and a bottle of Lemon Zest Dylusions mist for this technique and at first I wasn't crazy about it. It came out too shiny for my liking...so I grabbed my trusty wet paper towel and some Claudine Hellmuth white paint and drabbed it down a bit with the paint. I love how it took away a lot of the shine, but still left the brightness of the colors!


This picture is at least 5 years old now, and I have to admit that unless they're not printed yet, or in a photo album, I'm kind of hard on pictures and this one is no exception...sadly it has a bend right in his face, but I still really wanted to scrap this picture because it's just so cute! I can't believe my oldest is 7 1/2 already! Time flies like crazy!


That little turquoise chevron arrow was made with an embossing pen, some ZING! embossing powder and a Studio Calico stencil. I hate to admit that I've had my embossing pen for probably 4 years and this is the first time I've used it, but I must say for stencils, I'm LOVING IT!


My title was made with Heidi Swapp's Color Magic Alphabet and some of those yummy Hero Arts Neon inks! I think those are my new fav inks at the moment! For the word "Car" I used Thickers DIY alphabet. It's meant for sticking glitter and microbeads and flocking and such to it. I actually just recently downsized my scrap room considerably and got rid of all of my glitter and flocking, and I knew that they didn't work for heat embossing because the foam would melt, but I thought it couldn't hurt to just use the embossing powder and not heat set it right?! It totally worked out and I'm loving the flocked look it gives my letters!! 


Well that's all for now! I have to go pick up the one who is in this picture from GRADE 2 now!! lol It always shocks me to look back at pictures and see how tiny they used to be!! Makes me a little sad!

Blessings,

Sarah

Supplies Used: Patterned Paper: Amy Tangerine. Studio Calico: PL 4x6 Card, alphabet, stamp, wood veneer, mister huey's and stencil. Cosmo Cricket: tags. American Crafts: Stamp, Alphabet, and embossing powder. Ink: Hero Arts, and Versa Mark. Heidi Swapp: Colour Shine Mist, and Alphabet. Dylusions Mist. Claudine Hellmuth: paint. Jillibean Soup: Twine. Flair: The paper Bakery. Enamel Dots: My Mind's Eye. Janome: sewing machine. Gutermann: Thread. Other: Drywall Tape.


Monday, April 22, 2013

Sweet as Honey

Hey Hey! Just popped in to show you a fun layout I made for a colour challenge over at Rochelle Spears' blog. It's a colour challenge where we had to use at least 3 of the 5 colours: 


Now, they're not exactly the colours, but I think they're close enough ;) She's also gotten together with some of her friends that are doing challenges and if you link up to two of them, you get entered in a bonus draw, so I thought why not?! Kristi B's challenge is to use something that flies on your layout. I just so happen to have these cute little butterfly stickers on this one :)

I loved these selfies that we took in the backyard last fall. They're kinda goofy, and I just love my kids faces in them! Adorable!


There was a huge mixture of products used on this layout. A bunch of stuff from my Studio Calico kit was used, but I also dug deep in my stash and got out some basic grey stickers from last year's BG layout of the month club, and the hexagons and sentiment are a new fav CTMY stamp of mine that I got a few months ago at a crop. I'm really loving the super wide washi tape...it's very fun :)


I just got my Clip it Up in the mail and I'm working on getting everything all "clipped" so I will leave you now so I can go back to organizing!! EEEK! I kinda love organizing my scrap space! How about you? Are you into organizing or are you creatively cluttered?! I tend to be a bit of both, but since my scrap space has moved upstairs into my kitchen, I don't have the luxury of being a mess anymore! It's kind of awesome though, because I used to have to clean a space to work, but now it's almost always clean when I get started! 

Anyhoooo...back to clipping!!

Blessings!

Sarah

BTW: You still have time to come and play with us over at Seriously Creative Challenges! Head on over there for details!!


Thursday, April 18, 2013

The Biggest Dog

Hello Bloggers!! 

I wanted to share a layout I did for a bunch of different reasons actually! I found the sketch on Creative Scrappers and their sponsor this month is Scrapbook Nerd. I'd never heard of Scrapbook Nerd, but I really liked their name and I was intrigued! So I headed on over there to check them out...turns out, THEY'RE AWESOME!! They have an amazing online store (and they're Canadian too!! WHOOOP!!) They also have a forum where they have fun challenges, technique talk, and also just various scrappy conversations with fun people!!  They also have a gallery where you can post your projects and be super inspired by all the fab artists there too!! 

Turns out, they're also having a DT call!! So I made this layout to participate in the sketch challenge over at Creative Scrappers, but I also made it to apply for the Design Team :)

The pictures are of our wicked awesome (and insanely HUGE) dog Luca. We got him when Kieran (our 3rd son) was 6 months old, and I must admit, I was a little scared to have a puppy and a baby, but he was such an easy dog to train! He's so smart and we just love him to death!! I found my title online when I was looking for quotes about dogs. I thought it was quite perfect for him :)


I'm loving this view finder from Basic Grey! How cool is that? I love that you can put any kind of paper behind it and it totally changes the look of it...or you could just leave it and use it as a subtle accent for your page!


I put the journaling on a tag that I tucked behind the photo. It reads: "When we got Luca he was 12 weeks old. We knew he was going to be a decent size dog, but we had no idea just how big he would end up! He is a big moose, but he is the most gentle, loving dog there is! When we decided we wanted a dog, God found the perfect one!"


Supplies Used: Cardstock: Bazzil Basics. Patterned Paper: Echo Park, Tim and Beck, and Glitz. Basic Grey: Metal tabs (recoloured gold with Adirondack Alcohol Inks Metalics), Stickers, Viewfinder. Washi: Glitz, Alphabet stickers: Prima, Lush, Jenni Bowlin Studios. Canvas Stickers: Cosmo Cricket. Button: Bo Bunny. Speech Bubble: Pebbles Inc. Wood Veneers, Flair and Mister Huey's: Studio Calico. Ink: Distress Ink (Vintage Photo). Sewing Machine: Janome. thread and tag (unknown). Die cutting machine: Vagabond, dies: Lifestyle Crafts.

I'm also going to enter this into the challenge over at Scrapping Everyday Miracles: Pet Inspired Projects.

Thanks so much for stopping by! I really appreciate your comments! They mean the world to me!!

Blessings

Sarah


Monday, April 15, 2013

It's pretty serious

So, last night I drank a coffee at around 7pm...most of the time I can do that without it affecting me. Since I've gotten a little older though, it seems to keep me awake off and on...the problem is I never know if it's going to keep me awake until it's midnight and I'm wide awake! Anyway, last night was one of those nights! I was up until 2 am....on a good note, I got this layout done, and I have to say I'm really liking how it turned out!
I used this fab sketch from Artful Delight:


When I saw the sketch, I just knew I wanted to use my new white Dylusions Mist and make it all drippy and fun!! 


The paper I used is from my stash for sure! It's an older Crate paper design. I have loved it ever since it came out, and I think I even used it on a layout when it first came out, but had to buy more! I'm glad I did!! The red and grey dotted paper is from my scraps, and I layered it with some Tim Holtz tissue tape. I ran out of pop dots a while ago and haven't gotten around to getting more, so I cut up some cardboard and taped it on the back of some of my elements to pop em up! Not sure why I ever buy pop dots now! lol The flair is from the Paper Bakery, and the little journaling blocks are from October Afternoon (I think). I made the banner with some twinery twine and the chipboard stickers from Bo Bunny's Mamarazzi 2. The alphabet stickers are Jillibean and Prima.

I'm going to enter this into the challenge over at Use it Tuesday: Sticky Situation: (I used alphabet stickers...the prima ones I bought quite a while ago and hadn't even opened them yet! The Jillibean ones have been in my stash for a couple years now!) 


Thanks for stopping by!!

Blessings

Sarah


Sunday, April 14, 2013

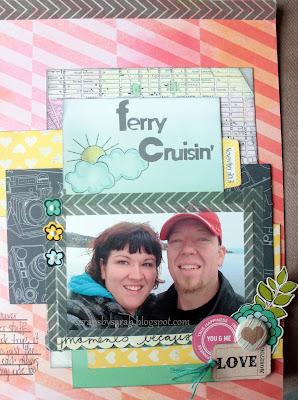
Ferry Cruisin'


Hey Hey :) Just wanted to pop in quickly to share a layout I made using this month's sketch from Stuck Sketches


I've been trying to use up my Studio Calico kits, because when I first started receiving them, I was not scrapping a lot...so I have a whole ton of kit supplies left. So some of this was a kit, but other stuff was from a recent trip to Langley where I went to Clipper Street :) I bought 20 rolls of washi!! wooohooo!! I totally needed it though ;) right?! 
The photo was taken on the ferry going to Vancouver Island. Chris and I went there in November to help a friend move her stuff. It was a super quick trip (there and back in two days) but it was kinda like a two day date because my mom had the kids!! It was a lot of fun and it's always nice to help someone who needs it too! Plus, I haven't been on a ferry since I was 5 years old, so it was a great experience!! 


 Seeing as how I bought so much washi, I thought I'd use some of it up ;) I made a frame with it, and also put a strip of it along the top as well! I cut up a few 6x6 papers and layered them along with the fun camera paper :) 

The flower stickers were ones that were from a Studio Calico kit that were totally not my style, but I really like how they went with this layout. The sun and clouds are a rub on from Amy Tangerine that I coloured a bit with my Distress Markers.


Anyhoo...I'm off to my mom's for dinner, so I've gotta run! We're going to a talent show at Ethan's school tonight...should be fun!

I hope you all had a great weekend!

Blessings

Sarah

Friday, April 12, 2013

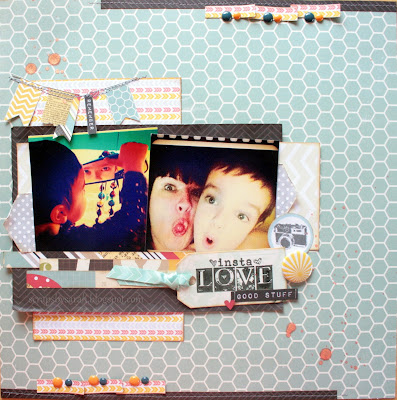
Insta Love

Hello! Hello! I just wanted to quickly pop in and share a layout I just finished using this fabulous sketch from The Paper Bakery. They are an awesome kit club and they also have custom flair! They also have FREE SHIPPING until April 14th!!! Wooohooo!!

Anyway, here's the sketch:


And here's my interpretation:


All the papers are from Simple Stories except the chevron paper and that is from Webster's Pages. I love the Simple Stories paper because they're so good for making embellishments with. I pretty much embellished this page with fussy cut paper and a bit of stitching. Oh, and some fun flair from the Paper Bakery ;)


I got that Insta Love stamp from Unity a while ago and I've been dying to use it! I thought these pictures where perfect for it! I stamped it with Staz On on a Fancy Pants package and die cut it into a tag with my Tim Holtz tiny tags die.

Well, I've gotta go pick up my son from school, so I shall leave you now....Peace out and have an awesome day!!

Challenges: Paper Issues (Insta Love) and The Paper Bakery (sketch)

Thursday, April 11, 2013

This is Me

Good Afternoon Bloggers!! It's a gorgeous day today and I should totally be out raking my leaves, but I decided I'd rather show you what I've been working on! I'm taking a class right now over at Studio Calico called This is Me. I am  totally loving it so far! I really think it's important to take time to scrap book about ourselves as well as our children. When our kids grow up, I'm sure they will like to see layouts of themselves as kids, but I think they will really appreciate learning about what Mom is all about :)  It's also really easy to lose yourself when you have kids, so I'm finding this is a great opportunity to find myself again and I'm really enjoying this experience!

I'm using a SNAP album from Simple Stories for this and I've done a little bit of alterations to it :) I mostly just used some washi and vellum and a bit of mist, but I also used my Crop a Dile to punch a hole in it and thread that fun chevron ribbon through it :)


My first layout is just kind of a title page layout (without a title I might add lol) I used a fab Studio Calico mask that has these circles, but it also has repositionable circles within the circles that have different shapes too! This is not an original idea...I actually got the inspiration for this layout from Lisa Truesdell. She does a fabulous tutorial on this mask. You can check it out HERE.

I finally got my sewing machine back from my mom's house too so I was able to do some machine stitching on this layout. I just love the look of stitching! It adds so much interest!! 


 The second page I made was kind of a list about what's currently going on in my life as far as music, style, diet, and my thoughts and feelings. It will be fun to look back on this one in a few years from now to see how my tastes have changed :)

 I'm loving the multi-hued pink Thickers!! I embossed some wood veneer arrows with some turquoise ZING! embossing powder and I'm really liking the outcome :)

I'm going to enter these into the challenge over at Show us Your Stuff where they want you to use a smaller format. This is definitely smaller than my usual 12x12 scrapping! 

Well, that's all for now! Stay tuned for some more of my This is Me album!

Tuesday, April 9, 2013

Seriously Creative April Challenge

Good Evening y'all ;) It's the beginning of the month, so it's time for a new challenge over at Seriously Creative Challenges and since we're into Spring Cleaning full force over here, we thought it would be fun to have a "Clean Sweep" challenge!! So, all you have to do to link up with us is create a layout/card/altered project with a clean style to it, or "clean up your stash" and USE some of it!! haha ;) 

I created my layout with a clean style to it. I've been kinda into that style lately, which is kind of funny because a year ago my style was the exact opposite! Funny how our tastes can change!

The pictures are from our girl's trip we took to Vegas last year with my mom and sister. We went and saw Elton John at Caesar's Palace and he was amazing! 


not too many embellishments on this layout, but I did make a couple little fun starbursts with my silhouette :)


I'd say this challenge is pretty easy...unless your totally not into a clean style, and you're a hoarder of supplies! lol Link up your layout over at the Seriously Creative blog to win some goodies!

I'm entering this layout into the following challenges: 2 Broke Girls (love this show btw!): Make your own embellishments
The Paper Nest Dolls: Anything Goes!

Thanks for popping over to my end of the web!! I'm working on a fun album right now called "This is Me" from a class I'm taking over at Studio Calico, so stay tuned for some of those pages! I'm actually really looking forward to doing an entire album about myself ;) I think it will be something really fun to look back on, and also we all know that as much as our kids will want to look at pictures and layouts of themselves when they were young, I really think they will want to get to know "mom" too :)  If you're feeling inspired, play along with me! I'd love to see what you create too!! 

Blessings,

Sarah

Thursday, April 4, 2013

Stamp of the Month!!

Good Morning Bloggers!! (And do I ever mean morning!! For some reason I woke up and have been wide awake since 4:30am! Rather than just lie in bed trying to go back to sleep, I decided I should get something done, so here I am!)

The ladies over at Creative Accents have a program called Stamp of the Month. It's free to sign up, and every month they choose a stamp that you are required to purchase, but here's the great news...if you're in that club, you get 35% off that stamp!! Plus there's other perks and bonuses to being in SOTM! So, for April, they've chosen this fabulous Hero Arts stamp, and they asked me to play with it and make a couple cards! I so love the versatility of this stamp!! As a scrapbooker, my main function of a stamp is that it has to be able to be used on layouts, but this one works for both and I love that you can use the whole stamp, or cut it up for a few different sentiments! Soooo much fun!!


For both of these cards I used the new MME Boy Crazy line...holy!! Do I ever LOVE this paper!!!!

For the first card, I stamped just the last sentiment. I inked it with Tim Holtz's new Distress Paints and I freakin love the way this stamp and those paints work together!! The background sunburst is actually another Hero Arts stamp for Studio Calico and I stamped it with the Distress Paints too, and then cut it out and glued it onto a kraft background.


 I just love how the Distress Paint raises the edges of the stamp and gives it such great texture!!


For my second card I wanted to use the whole stamp and make a fun birthday card. I stamped with 3 different colours of ink creating a fun Ombre effect. It was kinda funny, because the first time I inked it, I guess I hadn't cleaned it from the last time I used it, and it turned out orange, and purple!! It actually still looks kinda cool though, so I will definitely be using it for another birthday card...probably my son's...he'll be three in May! Anyway, I pulled out some Doodlebug twine and wrapped it around the card a few times and joined it together at the bottom with this cute little embellie I made. I cut out the "oh boy" from my 6x6 paper pack and die cut it with Tim Holtz's new bottle cap die. I also die cut the same shape in grunge board. Now that I've done this once, I would definitely recommend cutting the paper and the grunge board at the same time, because what I didn't realize is that the scalloped edges aren't uniform, so I had to twist the paper around a bit to find where it matched up...not a big deal, but it would've been a lot easier if I would've glued the paper and grunge board together before cutting!! Lesson learned lol


So there you have my cards for SOTM! If you would like to sign up to be a part of that super awesome cool club, then just give the ladies over at Creative Accents a shout! You don't even have to live in Williams Lake...they'll ship too! yay!!

I'm going to enter this last card into the challenge over at Simon Says Stamp. They're having a birthday celebration, so their theme is....Birthdays of course! 

Well, I think now that I've done a load of laundry and done up my blog post, I might just try to go back to bed and see if I can't get another hour of sleep before the rest of the family wakes up!! I must say, aside from the fact that I am totally NOT a morning person, it is nice to be up while no one else is to have a little quiet time to do what I want ;)

Peace!

Sarah